Release 11.91 was posted on May 6 (installed) and May 7 (USB patch). It has fixes for Packet Flooder and Ping Scanner plus some improvements to Packet Player and PingTrend.
Packet Flooder. Ok, so over the last few months I had reports of the gauge and graph not working and also the new automatic flood mode not working. All reports were from outside the US. Clue #1 - non English Windows OS. By working with one of these customers I figured out why: performance counters are localized to the user's language. Oops. I was accessing three of them to populate the gauge and graph. I was using the English language names of the counters which did not exist in non-English OS's. So I changed it to access the counters by numerical index, then convert that index to the localized name and access the counter I needed by interface name. These are the same counters used in Performance Monitor and Task Manager (pdh.lib for you programmers).
Other fixes were minor but important and a new feature called 'Run Action' was added. This allows the normal run until stop is pressed and also allows a new timed mode where you specify how many seconds you want it to run.
Ping Scanner. The problem here was two-fold. If you scanned a range of IPs outside your subnet and had Do Local ARP Scan checked, it took a long time. And it could be a very long time. The software appeared to hang even though it was not hanging up. The 'SendArp' API function tries to send the ARP packet even though the target is not local - I consider that a flaw. That was fixed by making sure the target is local. The other problem was the Do SMB/NBNS - it would be very slow if your own IP address was in the IP range. Again, easily fixed by skipping your own IP.
Packet Player (found by going to Packet Generator and clicking the button in the lower right) has a new feature that repeats sending the packet stream indefinitely until Stop is pressed. However, note that the Stop button can only be polled after the current packet capture stream is sent. It also automatically loads the last selected packet capture stream into the display grid on startup.
PingTrend has a new checkbox for setting the DF (don't fragment) flag in the IP header. If you do that, be careful because if your data section size exceeds the MTU less the headers, nothing will be sent. I also increased the accuracy of the reported time between packets.
How to get 11.91. If you have an active maintenance plan you can download the 11.91 full installer or USB patch by clicking on Help menu/Check for New Version and following the instructions.
The maintenance plan is currently discounted. Click on Help menu/Maintenance Plan Renewal to see the new pricing.
Friday, May 8, 2020
Monday, December 31, 2018
Happy New Year!
Happy New Year!
Current software versions
NetScanTools Pro 11.86.1
Managed Switch Port Mapping Tool 2.82
NetScanTools LE 1.63
NetScanTools Basic 2.52
Current software versions
NetScanTools Pro 11.86.1
Managed Switch Port Mapping Tool 2.82
NetScanTools LE 1.63
NetScanTools Basic 2.52
Friday, February 9, 2018
NetScanTools Pro 11.84 Released Jan 25, 2018
The big news about release 11.84 is SMB Scanning. Back in May 2017 during Wannacry we had several people check out the Network Shares - SMB tool and ask if it scanned specific devices by IP address. It does not really do that since it uses only NetBIOS, so I set about to make a tool that does these things:
Here is an animated GIF showing the new SMB Scanner in action:

- connect to NetBIOS Name Service and grab the 'Windows computer name' and MAC address.
- connect to SMB port and test the SMB service for supported versions. Every supported version is shown.
- show latency.
- do this for a list of IPv4 addresses or hostnames. IPv6 will be added in a later version.
Here is an animated GIF showing the new SMB Scanner in action:

You can use the SMB Scanner Tool to see supported SMB versions and check for vulnerabilities based on those supported versions. It identifies SMB 1.0 support in red because we already know it is compromised. More about the SMB Scanner.
IPv6 improvements
Another important addition is the new multicast Ping button that helps you discover IPv6 neighbors in the Network Neighbors tool. What this button does is ping the link local multicast address and this forces neighbor discovery to happen. The results are then updated after 10 seconds showing all responding link local IPv6 neighbors.
How to get NetScanTools Pro 11.84
If you already have an active maintenance plan for NetScanTools Pro, click on Help/Check for New Version to login and download the full installer.
Friday, November 10, 2017
Managed Switch Port Mapping Tool v2.78 Released November 8, 2017
This release has one new function that has been requested by our users many times: the ability to export the results of a Switch List mapping to XML for easy opening in Microsoft Excel. Here is what it looks like when opened with Excel.
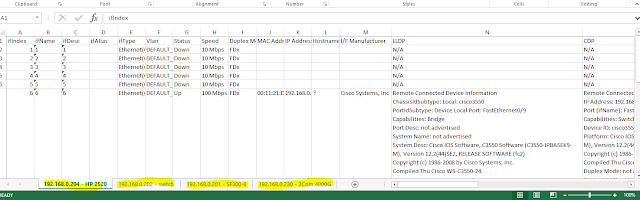
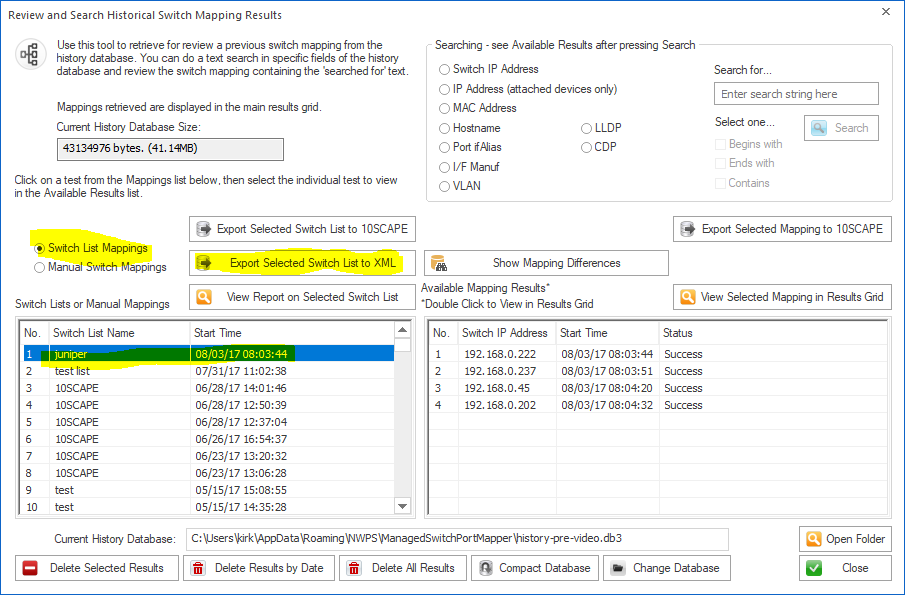
After mapping a Switch List, go to Review History, then select the Switch List and press Export Selected Switch List to XML.
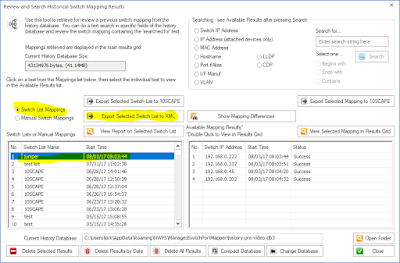
While we are looking at Review History, another thing added in this release was searching of LLDP and CDP fields. See it below.

Those are two of the more important changes in v2.78. Here are all the changes. Download v2.78 from http://www.switchportmapper.com/download.htm
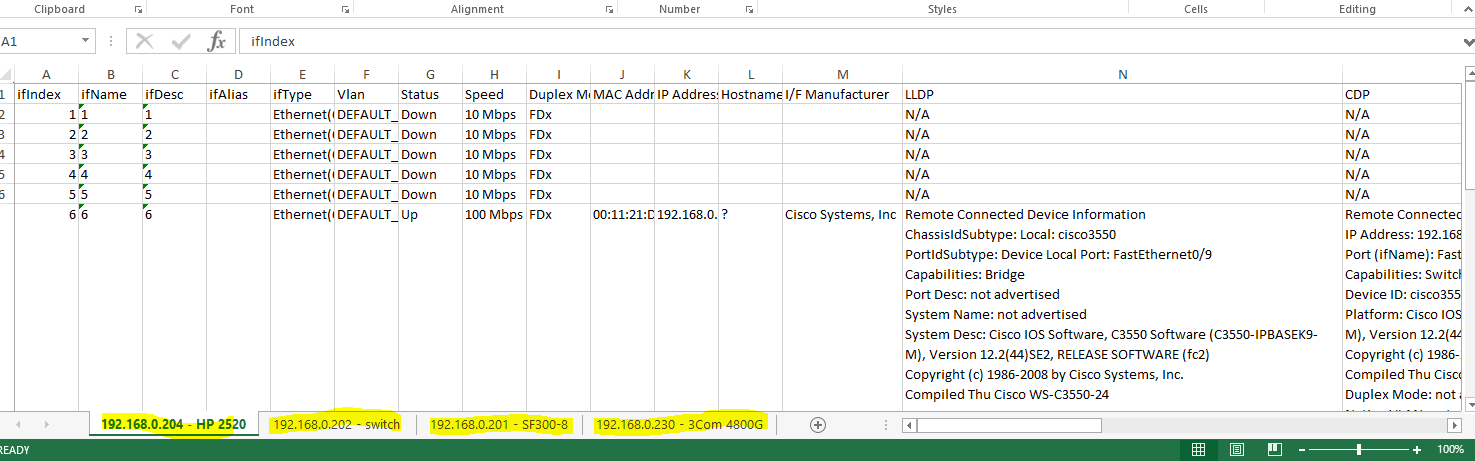
After mapping a Switch List, go to Review History, then select the Switch List and press Export Selected Switch List to XML.
While we are looking at Review History, another thing added in this release was searching of LLDP and CDP fields. See it below.

Those are two of the more important changes in v2.78. Here are all the changes. Download v2.78 from http://www.switchportmapper.com/download.htm
-New XML export option for Switch Lists from Review History.
When the XML export is opened in Microsoft Excel, each switch results appear as
a separate sheet. Each row in a multi-row port (ports with more than one mac
address) are shown as separate rows in the XML output. Export progress is now
shown on the bottom status bar.
-Review History/Searching now has selections for searching
LLDP and CDP for text strings. Searching now defaults to 'Contains' if no
options are selected and the search results shown in the right hand list are a
bit wider. Search results are now shown in descending order - newest at the top.
'RecNo' in the two lists have been changed to 'No.".
-Corrected reporting of Switch Operational State for Extreme
Networks switches.
-Corrected and removed '00 00' showing in Interface Alias
column for Force10 switches.
-Warning is now shown if 10SCAPE export does find LLDP data
for the switches. Switches with no reported LLDP data are shown. Export progress
is now shown on the bottom status bar.
-Added new right click menu option to clear both the results
grid and the Switch Info left control panel window.
-Improved parsing of MAC and IP addresses from LLDP data.
-Added Interface Manufacturer derived from remote MAC address
in LLDP.
-Moved four tables from spmap database to working
database.
-Updated SQLite to version 3.21.0
-Updated MAC address/Manufacturer database.
Wednesday, September 20, 2017
NetScanTools Pro 11.83 Released September 15, 2017
This release improves the user experience in several areas and the UI is less cluttered.
Back when we started adding tools that depended on WinPcap, a computer typically had one interface that WinPcap could use for receiving or sending packets. That has all changed. VPNs, Virtual Machines and secondary network interfaces can all potentially add WinPcap compatible interfaces and those interfaces all show up in the WinPcap Interface dropdown list. The problem is that prior to v11.83 you had to select the right WinPcap compatible interface or the tool did not work right and you saw a message to select the correct interface. What v11.83 brings is automatic selection of the interface based on the input you give. This applies to a number of tools in NetScanTools Pro like ARP Scanner, Ping, Traceroute and others. You will still have to select the correct interface in many of the separately launched tools like Packet Capture or Passive Discovery because those tools are listening tools rather than 'packet sending/listening' tools.
Over the past few years typical monitor sizes (pixels HxW) has radically increased. We originally designed NetScanTools Pro to accommodate monitors as low as 800x600 but I personally use a pair of 1920x1080 monitors. I reviewed our web traffic on Google Analytics and found that nobody is using 800x600 or even 1024x768 so this new version of NetScanTools Pro expands the layout of the buttons and other controls on the right side and spreads them out as a first step towards reducing clutter.
Another annoyance was the 169.254.x.x popup message that appeared on startup, usually if you had Npcap installed instead of WinPcap. The message is gone and 169.254.x.x interfaces are not included in any tool (except those that show interfaces) since they are auto-assigned IP addresses from the operating system and actually not functional.
Many other changes and they are listed below. If you have an active maintenance plan you can download 11.83 through the Help menu/Check for New Version.
The list of changes.
-Usability improvement: Tools that depend on selecting the
right WinPcap compatible interface now automatically select the interface based
on the target entered. This includes ARP Ping, ARP Scanner, DHCP Server
Discovery, Duplicate IP Detection, OS Fingerprinting, Ping - Enhanced, Port
Scanner, Promiscuous Mode Scanner, and Traceroute. 'Launched' monitoring tools
still require you to select the interface to monitor.
-Reports now have expanded information regarding the settings
used for these tools (most are in the 'Notes' section of the report): Packet
Flooder, Ping - Enhanced, Ping Scanner, Port Scanner, and Traceroute.
-DHCP Server Discovery now times out quicker if the local port
68 is in use and any network adapters with the IP starting with 169.254.x.x are
not shown in the list because they are inactive.
-Maintenance Plan Expiration and other startup messages that
appear before the main window is active are now force to appear as the topmost
window. This stops the problem of starting NetScanTools Pro and not seeing
anything because a startup message window was behind another window.
-Ping Scanner now includes a right click menu option to use
your web browser to connect with the selected IP address.
-Fixed minor memory leak in Network Interfaces and
Statistics.
-Removed startup message about 169.254.x.x interfaces which
shows up more frequently if Npcap is installed instead of WinPcap.
-Began the first steps of a UI improvement by expanding the
area used by the tools in the right hand panel. Our research shows that most
displays are now wide enough for us to de-clutter the right hand side by making
it wider and moving controls.
-Ping: changed the default header acknowledgment field value
to 0.
-Traceroute: added header acknowledgment field as a user
defined field in Settings.
-SSL Certificate Scanner: Added parsing of Subject Alternative
Name (SAN) fields. Shown in the certificate chain. Previous retrievals of SSL
certificates are noted in the grid when you edit or start the software. Right
click to access the certificate chain. Added more parsing of signature
algorithms so OIDs will be less likely to show up.
-Graphical Traceroute: Added Reset Statistics button.
-SNMP and SNMP Advanced: default bulk reps is now 8. Suggest
lowering to 8 if you are using SNMPv2c or SNMPv3.
-USB Version Only: startup on a host running Npcap now works
correctly.
-Updated SQLite to version 3.20.1
-Updated MAC address/Manufacturer database.
-Updated IP to Country database.
-Updated dates in all subprograms to 2017.
Tuesday, September 5, 2017
Managed Switch Port Mapping Tools v2.77.1 released August 30, 2017
Version 2.77.1 followed closely behind the release of 2.77. This minor release adds serial and model retrieval from Adtran switches. It also fixes some minor issues with importing devices from a text file in Switch List editor. SQLite was updated as well.
Version 2.77 was a huge release.
Managed Switch Port Mapping Tool v2.77 adds several features to enhance the user experience plus new features including one that has been requested a number of times for several years.

Select at mapping from the left list, then select one from the right list. Press ‘Show Added & Removed’ to see a list of what is present only in the first mapping (green) and the second mapping (blue) as shown below.


Full list of changes in this revision.
2.77 August 18, 2017
-Added button in Review History for comparing and displaying the differences between two mappings of the same switch at different times. One selection shows the difference between information present on the first switch mapping vs the second switch mapping. The other selection shows movement of a device from one port to a new port. The results of the comparisons may be saved/exported/printed.
-New information added to SNMP Error Report.
USB version users need to use
the Help Menu/Check for Update selection to obtain the upgrade patch.
Version 2.77 was a huge release.
Managed Switch Port Mapping Tool v2.77 adds several features to enhance the user experience plus new features including one that has been requested a number of times for several years.
One of the most requested features (for years) is this: a way to compare two mappings of the same switch to see what has
changed. It is now there under Review History (left control panel):

Select at mapping from the left list, then select one from the right list. Press ‘Show Added & Removed’ to see a list of what is present only in the first mapping (green) and the second mapping (blue) as shown below.

To see a list of devices moved from one port to another between
mappings, press Show Moved. The final port that the device
was moved to is shown in the list.

Another major addition is the ‘Test’ button. You can find it in the device settings. It give you a way to see if
the device (switch or router or other) can be pinged and communicated with
using the SNMP settings you have entered. See below:

Do you have Juniper, Ubiquiti and Force10 switches? We improved support for those switches and we even found that some
models of Adtran switches can be mapped – but not all.
Full list of changes in this revision.
2.77 August 18, 2017
-Added button in Review History for comparing and displaying the differences between two mappings of the same switch at different times. One selection shows the difference between information present on the first switch mapping vs the second switch mapping. The other selection shows movement of a device from one port to a new port. The results of the comparisons may be saved/exported/printed.
-Added Test button to Device
Settings. Use it to verify the device is reachable with Ping and verify your
SNMP settings are correct. It also can tell you if it is a switch or a
different kind of SNMP enabled device.
-The target switch is now
tested near the start of the mapping to see if it really is a switch, if not a
'do you want to continue' question is asked.
-Additional sources of warning
messages during SNMP single parameter retrievals were identified and the
warning suppressed. The warnings were sometimes interpreted by users as errors
and slowed the mapping process.
-New Command Line option (-txt)
to save the results of a mapping to a hybrid tab/CSV delimited text file.
Columns are represented by tabs and rows within a multi-row cell are
represented by commas.
-Improved export to 10SCAPE. If
required columns are missing, a warning is now shown at export.
-Column Order and Visibility
Editor: the 10SCAPE defaults button now turns off the Ping Sweep warning (see
Global Settings to reactivate it).
-Global Settings: the Display
Ping Sweep Not Configured warning message is now disabled by default.
-Global Settings: when switch
group specific settings (like MAC limit per port) are changed, the changes are
now saved to the currently shown left panel switch group.
-Switch List Editor: show final
report and show individual reports are now unchecked by default.
-Framework: menu and toolbar
are now fixed in place and not dockable.
-Framework: top titlebar is now
correctly updated to show the switch info when the mapping is complete.
-Juniper, Force10 and Ubiquiti
switches are now processed correctly and manufacturer specific details are now
retrieved.
-Some models of Adtran switches
are now supported.
-Juniper switches now show the
vlan name, internal vlan number and vlan tag as follows with the tag in curly
braces: MYVLAN(5){100}. Other switch brands will continue to show MYLAN(5) or 5
where 5 is the vlan number.
-In order to speed up the
switch list mapping process, the column widths are no longer automatically
resized in list mode.
-VLAN identification for older
3COM switches was improved.
-Improvements to data shown in
vlan columns.
-Fixed SQL syntax problem in
lldpLocChassisId when subtypes 1-7 are present.
-Fixed usability problem with
device settings editor where selections from existing community names would not
appear to 'stick'.
-Fixed XML export where switch
information is added in the left column.
-Added System Description to
CDP data.
-New information added to SNMP Error Report.
-Changed Review History icon.
-Updated SQLite to version
3.20.0
-Updated MAC
address/Manufacturer database.
Download the ‘installed’ version 2.77 from SwitchPortMapper.com and
install it over the top of your current installed version.
Wednesday, January 25, 2017
NetScanTools.com website major revision under way
You may have noticed that NetScanTools.com is being revised. Slowly. One or more pages a day. It started in late December 2016.
It's being changed from an ancient Frontpage template with annoying flash into a modern Bootstrap based website. We are actually using the Unify template from wrapbootstrap. The nice part about Bootstrap is that it automatically sizes to meet the browser viewport. What this means is that there is only one set of webpages viewable equally well on mobile and the desktop.
Here are a few example pages:
http://www.netscantools.com/nstprodetails.html
http://www.netscantools.com/nstpro_packet_generator.html
http://www.netscantools.com/download.html
http://www.netscantools.com/support.html
http://www.netscantools.com/nstproonline.html
http://www.netscantools.com/nstbasicmain.html
I hope you like the new look!
Kirk
Subscribe to:
Posts (Atom)